How to Update to iOS 13/iPadOS on iPhone and iPad
By Joakim Kling - Last Updated: Contact Author
On the WWDC of June 2019, Apple has issued iOS 13 and a brand new OS specially designed for iPad – iPadOS. For the very first time, iPad would be equipped with an OS exclusive to itself. Differing from iOS 12 issued last year which mainly focused on the improvement of performance, Apple has introduced a bunch of interesting iOS 13 new features: Dark Mode, gesture-based QuickPath keyboard on iPhone, sign in to apps with Apple ID etc. If you cannot wait to update your iPhone and iPhone to try all these new functions in the upcoming Sempter, let's preview the steps to get iOS 13.
iOS 13 Update Tutorials
Compatible Devices to Install iOS 13 and iPadOS
Will iPhone 6 get iOS 13?
Unfortunately, iPhone 6/6 plus didn't survive the update. Devices that support iOS 13/iPadOS 13 are as follows.
• iPhone XS/XS Max/XR/X
• iPhone 8/8 Plus
• iPhone 7/7 Plus
• iPhone 6s/6s Plus
• iPhone SE
• iPod touch (7th generation)
• iPad Pro 12.9 inch/11 inch/10.5 inch/9.7 inch
• iPad (6th, 5th generation )
• iPad mini (5th, 4th generation)
• iPad Air (3rd, 2nd generation)
Part 1 How to Install iOS 13 Over the Air (OTA)
OTA enables users to download upgrading package via Wi-Fi directly to upgrade phones. Here we take iPhone software update as an example.
Step 1: On your iPhone, go to Settings > General > Software Update.

Step 2: Wait for the notification about iOS 13 to pop up and tap Download and Install.
Note: You can also turn on automatic update (Settings > iTunes & App Store), scroll to Automatic Downloads section and toggle on Updates. If your device is connected to Wi-Fi and in charging, the device will update to iOS 13 automatically.
Part 2: How to Update to iOS 13 with iTunes
Apart from upgrading by OTA, upgrading with iTunes is another feasible method. Please notice that iTunes has been removed from macOS Catalina. You can install iOS 13 with Finder in similar steps.

Step 1: Connect your phone to the computer, and launch iTunes. iTunes must be updated to the latest version.
Step 2: Click iPhone icon on the top left in iTunes and go to summary section.
Step 3: Click "Check for Update" then click "Download and Update". The updating process will start.
Part 3: How to Install iOS 13 on macOS Catalina
Please note that the Apple Device management utility has moved to Finder on macOS Catalina, and iTunes is no longer available on this macOS 10.15 version.

Step 1: Connect the iPhone to the Mac, open Finder, find the iPhone in the left column. Then click it.
Step 2: Hit your iPhone or iPad device icon, and click "Check for Update".
Step 3: Follow instructions on the screen to install iOS 13.
Bonus tips: Solve iOS 13 Update Stuck on Preparation & Installation
Some users may meet with problems in the process of upgrading. If you do, please refer to the following troubleshooting:
Possible Solution 1: Delete iOS 13 Update and Reinstall

Step 1. Go to Settings > General > iPhone Storage.
Step 2. Scroll down and locate the OTA file of iOS 13, hit "Delete Update".
Step 3. Reinstall iOS 13 with methods mentioned above.
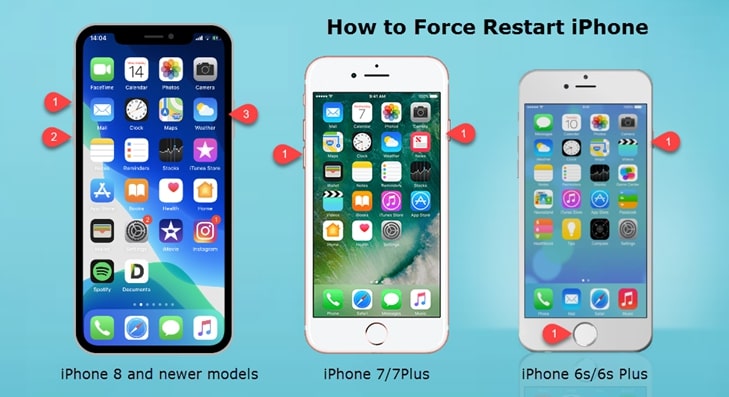
Possible Solution 2: Force Restart iPhone or iPad
Force restart, or hard reset, can help to recover the iPhone by force if the phone gets stuck or crash. Buttons to press are slightly different on older models to force restart.

• For iPhone 8 and later: Press volume up button then release, press volume down then release, and hold down power button until the image with Apple logo appear.
• If you are on iPhone 7/7 Plus: press volume down and power button simultaneously until the image with Apple logo appear.
• For older iPhone models with a home button: Press Home button and power button simultaneously until the image with Apple logo appear.
Check out detailed solutions to fix iOS 13 update stuck on verifying, preparing, Apple logo screen, etc.
Final Words
That's all about how to update to iOS via OTA, iTunes and its successor Finder and the possible solutions for iOS 13 stuck errors. We suggest that users wait for some time for there may still be some tiny bugs existing in the early version and the old models may not be perfectly supported.


