Summary: Wondering how to transfer videos from iPhone to PC? Besides messing around with the internal storage folder, you can find better ways here to transfer videos from iPhone to computer easily, fast, and never leave one behind (especially those outside the camera roll) - Using DearMob iPhone Manager.
We all love videos. However, one problem is they can be large. Even though you record with high-efficiency video format (HEVC), one minute of 1080P iPhone video can be over 128MB. In this case, transferring videos from iPhone to PC can help us save tons of storage space.
Surely, there are more reasons why we may need to transfer videos from an iPhone to a PC from time to time. For instance, we may want to edit the videos using desktop-based video editing software and backup memorable recordings from our iPhones to avoid data loss. The best part is importing videos from iPhone to pc can be easy as walking in the park. Read on to learn 6 of the best ways to transfer videos from iPhone to PC.

Tips:
All 6 methods can help you import videos from an iPhone camera roll to a computer. If you also need to transfer videos outside of the iPhone camera roll, such as the videos downloaded by Safari, purchased movies from iTunes Store, and the received video files via iMessage, then we recommend you to go straight to method 1. This method lets you transfer virtually all kinds of videos from iPhone to PC effortlessly.
1. How to Transfer Videos from iPhone to PC (The Best Way)
DearMob iPhone Manager offers an all-in-one solution for transferring videos, photos, contacts, and 15+ other types of files between an iPhone and a computer (Windows PC or Mac) or between two iOS devices. It supports almost all types of video formats including HEVC, 4K HDR, and Cinematic Mode videos. Even better? It's also capable of transferring photos outside of the camera call, for example, the movies you purchased from iTunes Store and the video files you receive and download on the origin or third-party apps. The most alluring part, you can transfer tons of videos in bulk, at full resolution.
See More Killer Features of DearMob iPhone Manager
- Decrypt DRM-protected media files like movies and TV shows
- Easily encrypt your videos, audio, and other privacy-sensitive data
- Fast transfer large and long videos like UHD 4K or HD 1080P videos
- Can compress large videos and convert HEVC to popular format
- Backup & restore iDevices. Manage & transfer iPhone/iPad data
Free download DearMob iPhone Manager to get started transfering videos from iPhone to PC!
Step 1. Connect your iPhone to your PC with a USB cable. Launch up DearMob iPhone Manager.
Step 2. Hit Movie & Video to enter a new panel.
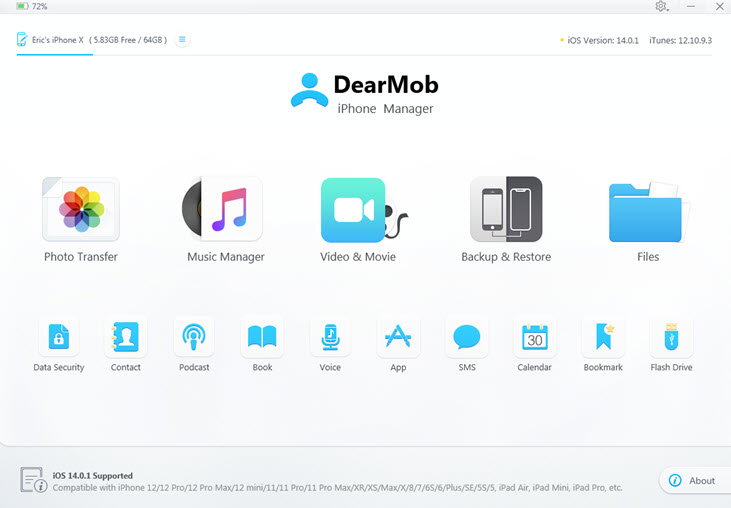
Step 3. Select the videos that you want to transfer to computer.
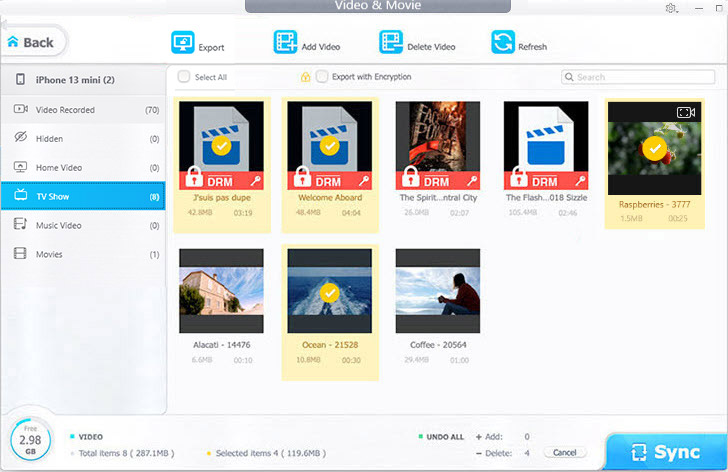
To help you easily find the target videos you want to transfer videos from iPhone to computer. DearMob iPhone Manager group all videos on your iPhone into 6 categories.
- Video Recorded: All videos, including cinematic mode videos, stored on the camera roll can be found here.
- Hideen Video: The hiden videos stored on your camera roll.
- TV Shows & Movie: The videos purchased and downloaded from TV (also known as Video) or iTunes Store.
- Music Video: The videos you saved from Apple Music.
- Home Video: The Videos you synchronized from iTunes manually.
Tips:
To transfer the videos you downloaded from other apps like Safari and Documents, click on Files or Apps located on the home screen and select the target videos.
To transfer the videos in text messages, hit Message located on the home screen and select the target videos.
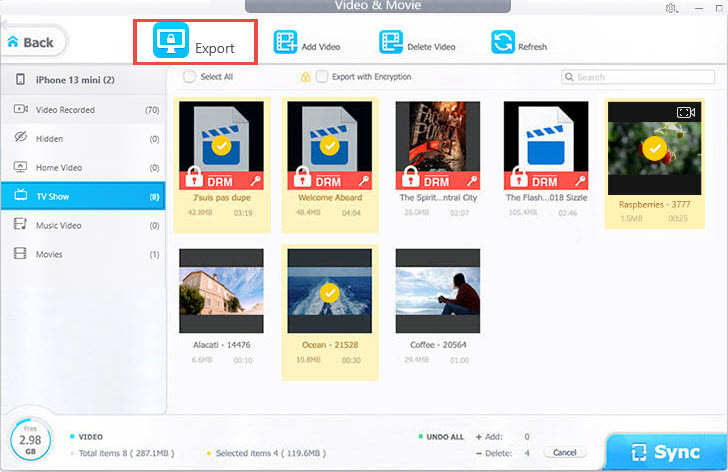
Step 4. Hit Export to start transferring videos from iPhone to PC.
Watch the videos to use DearMob iPhone Manager (transfer videos from iPhone to PC how-tos starts at 02:38)
2. How to Transfer Videos from iPhone to PC via File Explorer
If you can see the connected iOS device in File Explorer (or Windows Explorer) after connecting your iPhone and computer and you can see a DCIM folder after clicking the button of that iOS device, then congratulations, you can transfer videos from iPhone to PC via Fire Explore directly.
Note:
However, it's worth noting that this method can only help you transfer videos stored on your camera roll from your iPhone to the computer. Worse still, the DCIM folder saves videos and photos into a number of different sub-folders, according to the creation months. It's hard to find the videos that we'd like to transfer to PC. Transferring multiple videos shot in different months can be a challenge.
Step 1. Unlock the screen of your iPhone and then connect it to the computer with a USB cable.
Step 2. Click your device located on the left side of File Explore. Hit the Internal Storage folder. Choose the DCIM folder.
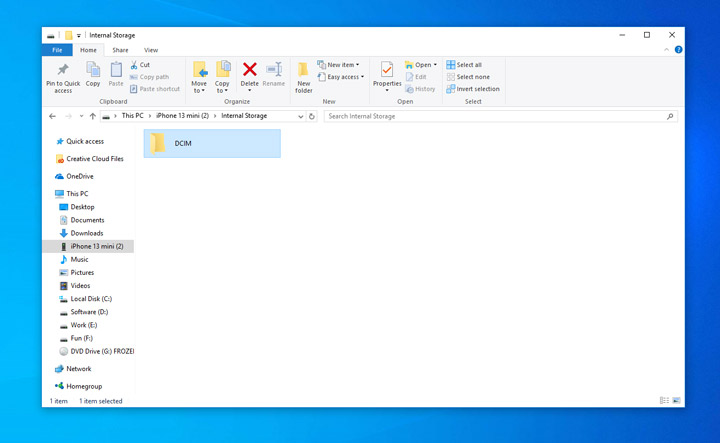
Tips:
If you don't see the DCIM folder, or the DCIM folder is empty, try switching to another USB port, and always make sure your iPhone is unlocked. Here are another four ways to fix DCIM folder empty or not showing up >>
Step 3. Go to 202301_, 202302_, 2023-3_, etc. Hit View and choose Type from the Group by menu. Now you can scroll down to find all video files under the selected folder.
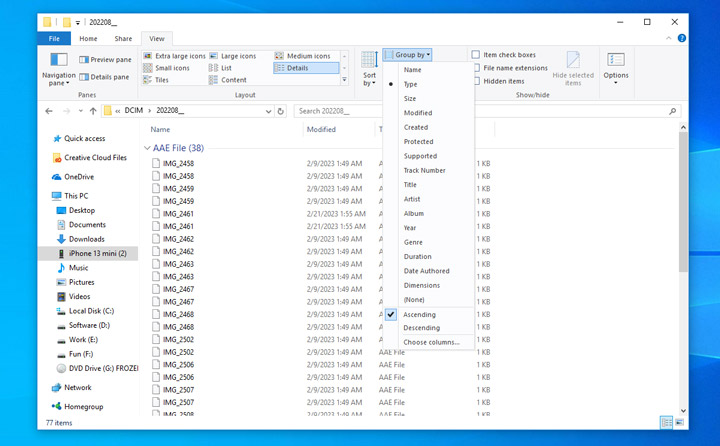
Step 4. Copy the videos that you need to transfer to the computer and then paste them onto the desired location.
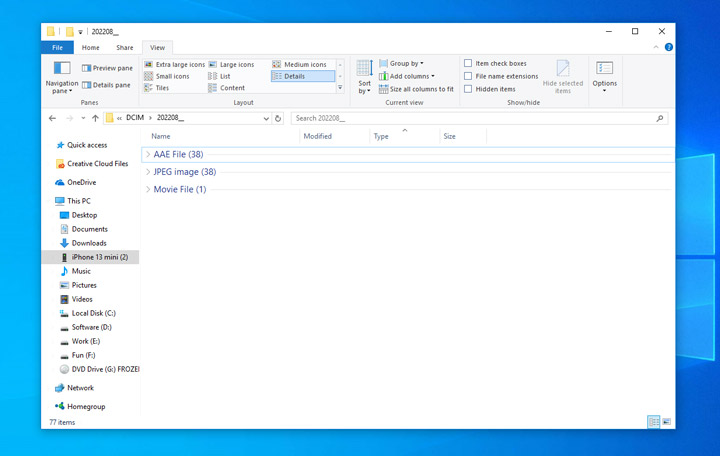
Tips:
It is safer to copy and paste instead of cut and paste. A hard lesson I learned: I cut and paste dozens of large videos from my iPhone to (E:) drive. During the process, the connection breaks somehow, and some videos are not copied to the destination folder, while they have already been removed from iPhone.
3. How to Transfer Videos from iPhone to PC via Photos App
Windows Photos App is a pre-installed program developed by Microsoft. It acts as a central hub for all the media stored on your local drive. It is the default photos viewer and displays our photos and videos in a photo library style, with smart utilities to create photo slideshows. However, you may not notice that the photos app comes with a dedicated Import option, with which you can transfer videos from iPhone to PC.
Note:
This method only enables you to transfer videos stored on iPhone camera roll to PC Windows 11/10.
Step 1. Unlock iPhone screen and plug it to the computer.
Step 2. Tap Trust when you are prompted to trust this computer.
Step 3. Open up the Photos app on Windows 11/10 (also works on Windows 8).
Step 4. On the top right corner, click Import > From a USB device.
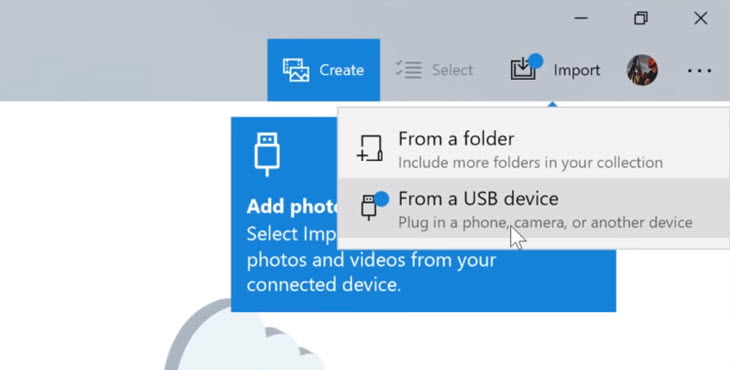
- From a folder: you can add a folder with photos on your computer, so that the photos app displays these photos as your collection.
- From a USB device: it will import photos on any camera device, including iPhone and iPad. iOS devices complies to the "de facto" DCF standard, or the DCIM folder that you are well familiar to. (Read more: Why Does Every Camera Put Photos in a DCIM Folder).
Step 5. In the pop up Window, you can see all your camera roll photos and videos. If you only want to import videos, go unselect all, and manually tick videos you like. When you are happy with the selection, go confirm importing these videos from iPhone to PC. If you have no desired to fill up your C: Drive, make sure to change folders via Import Settings.
4. How to Transfer Videos from iPhone to PC via AutoPlay
Windows 7 users? You can transfer videos from iPhone to PC using the Windows built-in feature - Auto Play. The import function in AutoPlay will treat your iPhone as a camera and access videos & photos in the iPhone camera roll. That being said, this method cannot help you transfer videos outside of your camera roll to your PC.
Note:
If the AutoPlay dialogue box won't pop up, besides manage settings in control panel, you can also right click on the device (iPhone/iPad) to import. To do this, open Windows Explorer, find your device on the left panel, right click and hit Import pictures and videos.
Step 1. Connect your iPhone or iPad to a Windows PC with the cable. Tap Trust this computer when you see the prompt on iDevice. If you don't see AutoPlay popup, switch to another USB port to re-connect your device.
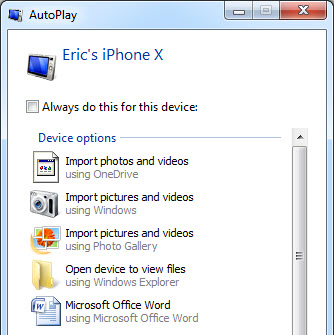
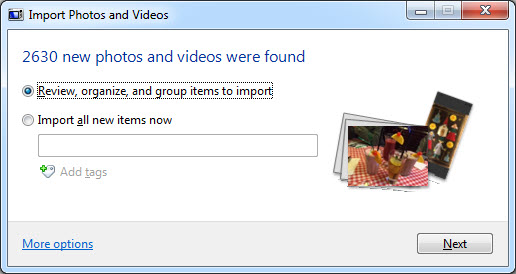
Step 2. Click Import pictures and videos using Windows. The AutoPlay utility will scan all the videos and photos on your iPhone. When it's done, hit Next. You can click More options to change import folder, file naming strategy (name + Date Taken, for instance), or enable the option to delete videos after importing.
Step 3. After scanning, your videos and photos in camera roll will be grouped chronologically. You can drag the slider at bottom right corner to adjust the time range.
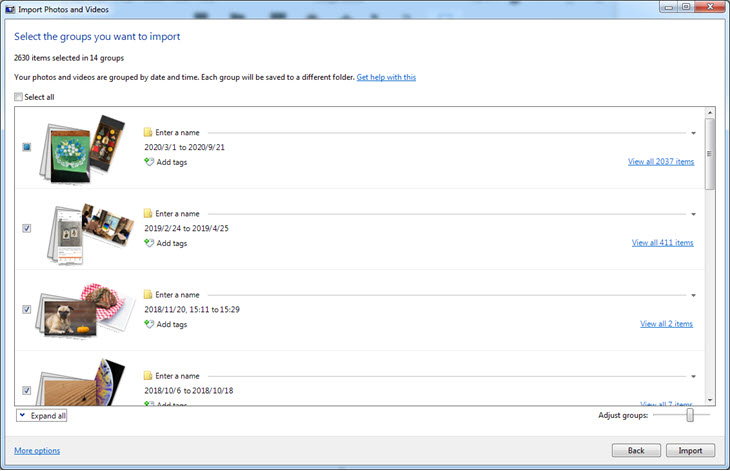
Step 4. Click Import to transfer videos from iPhone to computer for free. As you can see from the screenshot, there is no option to filter out videos from photos, unless you tick video files manually. One possible solution to get organized is, you can perform the importation regularly, say, every Saturday, or at the end of each month. Then, you can select "Import all new items now". When it's done, right click to group files by type, so that you can separate videos out of thousands of pictures.
5. How to Transfer Videos from iPhone to PC via iCloud
If you have good network connection and upgrade to iCloud large storage plan, enabling iCloud photos library is another workable option.
Note:
Sadly, iCloud transfer photos from iPhone to PC by syncing. This brings a lot of annoying issues. For example, you have to backup all videos and photos stroed on your iCloud or you may fail to find the videos that you want to transfer from iPhone to PC and iCloud can't help you import the paid movies and TV shows you purchased from Apple to computer.
Step 1. On your iPhone, go to Settings > Tap your profile photo on the top > iCloud.
Step 2. In Apps using iCloud section, tap Photos, and toggle it on for iCloud syncing.
Step 3. When you successfully toggled on iCloud photo syncing, wait for some time for the videos and photos to be uploaded online. Depending on your network condition, the process would take hours or days to finish for the first time.
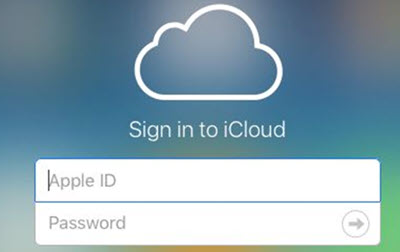
Step 4. On your computer, visit icloud.com or download iCloud for Windows app.
Step 5. Enter your Apple ID and password. If you have turned on two-factor protection, you need to authorize the logging-in on iPhone and enter the provided code.
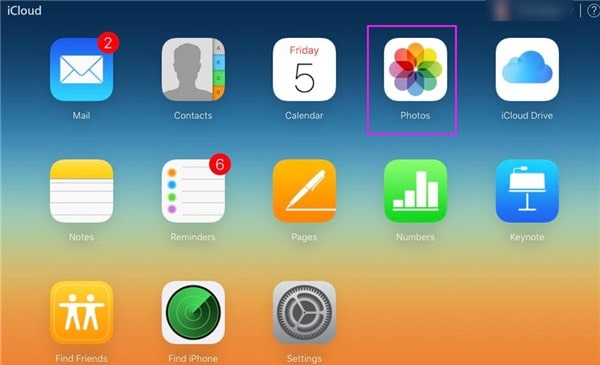
Step 6. Within iCloud, navigate to Photos, preview videos within, and download them to your local drive.
6. How to Transfer Videos from iPhone to PC via Email and Message Apps
This is one of the most common methods every iPhone owner would think of. Its drawback is obvious: the file size is limited, and it is inconvenient to transfer multiple files at once. However, this can be used as a workaround if you happen to need a compressed video file.
For instance, you may need to upload some videos to forums or online platforms with file size limits. Most Email apps allow you to attach a video with quality option, such as original, medium, or small sizes.
After adding videos, you can send it to yourself. Similarly, you can download Facebook Messenger apps for iOS and for PC to transfer videos, or any other Instant Message applications you use regularly.
What Is the Best Way to Transfer Videos from iPhone to PC
| Method | Video Type | Connection | Note |
|---|---|---|---|
DearMob iPhone Manager |
Camera Roll videos, iTunes purchases, movies, videos in messages, Files, VLC, etc. | Wired/Wi-Fi transfer |
Option to encrypt videos |
Windows File Explorer |
Camera Roll videos |
Wired transfer |
Videos scattered in subfolders |
Windows Photos App |
Camera Roll videos |
Wired transfer |
Videos will be imported to the Photos Library |
AutoPlay (Windows 7) |
Camera Roll videos |
Wired transfer |
Videos are mixed with photos |
iCloud |
Camera Roll videos |
Wireless |
Can't transfer selected videos |
Email & IM App |
Videos with Share |
Wireless |
Videos are compressed with noticable quality loss |
Free download DearMob iPhone Manager to import videos from iPhone to PC instantly:
