5 Ways to Transfer Photos from iPhone to SD Card
By Joakim Kling - Last Updated: Contact Author
"I know it's possible to import photos from an SD card to the iPhone using the SD card reader (I have one) but is it possible to do it the other way round, i.e. move photos from the iPhone to an SD card either using the built-in software or a third-party app?"—A user from Apple Discussion.
Just like this user, there are hundreds of users facing the same problem and wondering how to transfer photos from iPhone to SD card easily. They may transfer iPhone photos to the SD card to free up iPhone space, transfer photos to the micro SD card of the new Android phone, or make a solid backup for those precious photos. It's relatively simple to import photos from SD card to iPhone with an adapter, but these adapters don't support exporting photos from iPhone to SD card. No worry, the following 5 ways will help you nail the job within steps.
Find Your Favorite Way to Transfer iPhone Photos to SD Card
- • Simple, Fast, and Well Organized: Transfer Photos with Option to View by Type/Date/Albums
- • Access Camera Roll Only: Use Windows Explorer DCIM Folder
- • Transfer and Delete Photos: Use Mac Photos App
- • Wireless Solution: Via iCloud If You Upgrade Storage Plan
- • App Plus Online Solution: Via Documents by Readdle
Method 1. How to Transfer Photos from iPhone to SD Card in a Well-Organized Way
Regarded as one of the best data transfer tools for iPhone 16/15/14/13/12/11 and more, DearMob iPhone Manager is fully capable of transferring iPhone data like photos, messages, music, videos, contacts, ringtone, calendars, and more. Also, DearMob iPhone Manager can help you copy photos from iPhone to SD card in minutes. First, you need to transfer photos from iPhone to a computer and then copy photos from computer to SD card seamlessly. This workflow may sound a little troublesome in the first place, but it has some incomparable advantages over others.
• Transfer photos by albums and folders, which helps you to better organize photos.
• Provide better compatibility to convert HEIC to JPG.
• Export both edited photos and original photos in HEIC, Apple ProRAW, and HDR formats, rid you of annoying AAE files.
• If you are backing up photos to an SD card, you can encrypt them for privacy concerns.
• Support transferring photos from iPhone to computer without iTunes/iCloud.
• Running on both Windows and Mac computers.
Now let's follow the detailed steps to transfer photos from iPhone to the SD card:
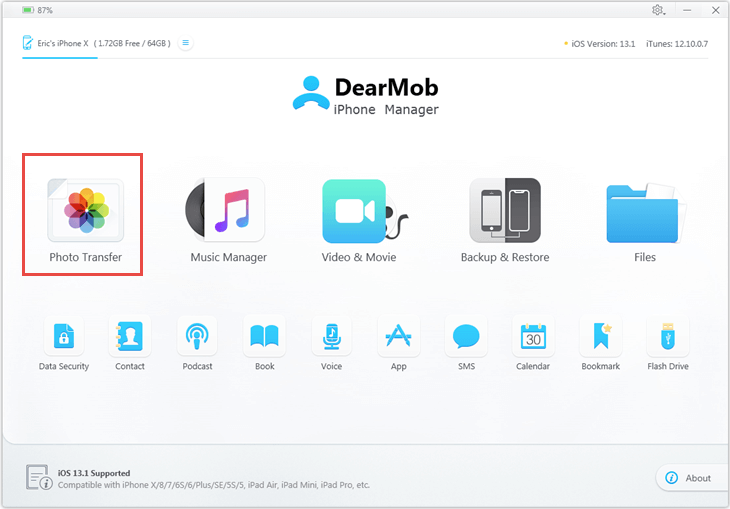
Step 1 Launch DearMob iPhone Manager for Windows (DearMob iPhone Manager for Windows) or for Mac (DearMob iPhone Manager for Mac), connect your iPhone, and click Photo Transfer.
Step 2. Select the photos you want to transfer and click the Export tab. You can export HEIC to JPG here.
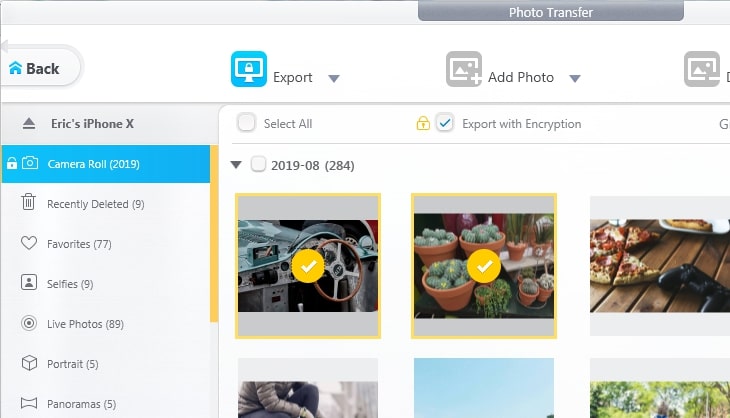
Step 3. Insert the SD card, and drag and drop exported photos into the SD card.
Tips:
Follow similar steps to transfer videos from iPhone to SD card. Movies, camera records, music videos, TV shows, etc. are supported. You can unlock DRM with this software.
Note:
1. The HEIC pictures may not be viewed on Windows PC, you can export them as JPG.
2. The Live photos can be exported as a JPG/HEIC picture along with a MOV video.
Method 2. How to Export Photos from iPhone to SD Card on Windows?
If you're using a Windows computer, then Windows Explorer may be the simplest way to transfer photos from iPhone to SD card. You don't need to install a third-party tool and figure out how to use it. Let's check the detailed steps below:
Step 1. Connect your card reader containing the SD card to the computer.
Step 2. Connect your iPhone to the computer via a USB cable and it will be detected automatically. Then you'll see a message on the iPhone asking if you want to trust the computer. Tap on Trust.
Step 3. In Windows explorer, click your device on the left column. Go to Internal Storage > DCIM, and click into each folder to preview your photos.
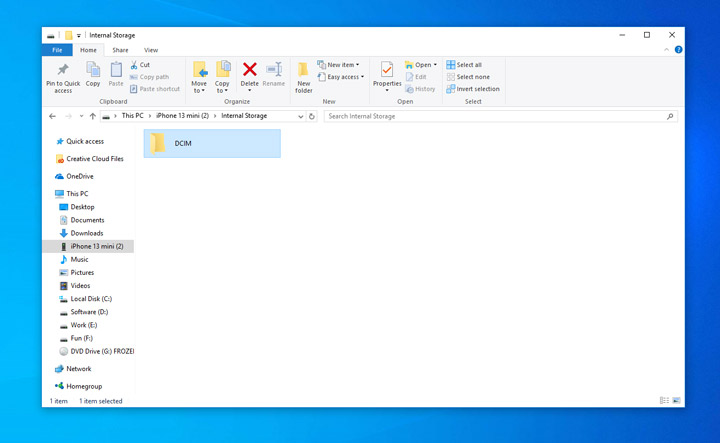
• Apple groups photos chronologically into folders like 100APPLE, 101APPLE, 102APPLE etc.
• Edited photos will have an AAE format file that you cannot open directly on Windows. If you want to copy both original photos and edited photos to an SD card, follow method 1 in the previous part.
Step 4. Press Ctrl+A to select all photos on iPhone, and hold down Ctrl + C to copy those photos.
Step 5. Go to your SD card and click Ctrl+V to copy photos from iPhone to SD card.
Pros
• No third-party tool is needed.
• It's free.
Cons
• The photos in the SMS and synced from the computer cannot be viewed or saved.
• It's impossible to sort photos by type, such as screenshots, selfies, favorites, live photos, etc.
• You can't view or transfer other iPhone content like music and movies.
Method 3. How to Move Photos from iPhone to SD Card on Mac?
For Mac users, it can also save much space on iPhone and keep precious memories safe by transferring photos from iPhone to an SD card. Since iPhone and Mac both belong to the Apple ecosystem, there are several ways to transfer data. Here we'll show you the procedures to transfer photos from iPhone to an SD card via the Photos app on Mac.
Step 1. Connect your iPhone to the Mac with a USB cable and tap Trust on iPhone.
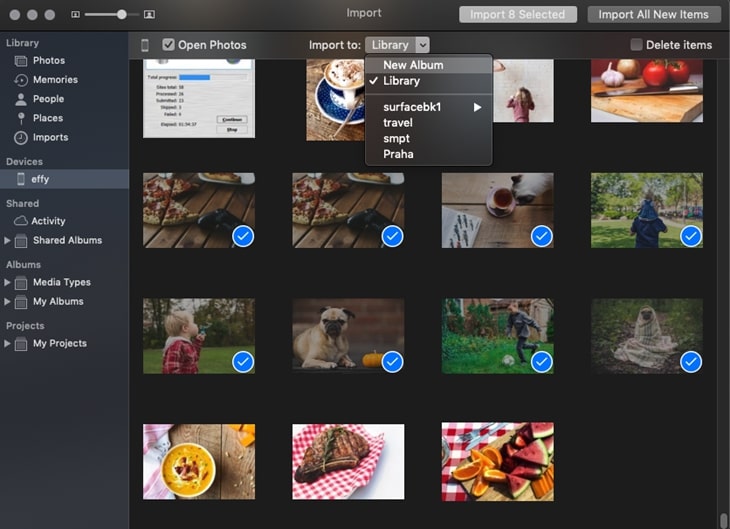
Step 2. You'll see your Camera Roll images and video on the Photos app then click Import All New Items to transfer all photos from iPhone to Mac or click Import Selected to transfer selected ones.
Step 3. Put the SD card into an SD card reader and plug it into the Mac. Then just copy photos from your Mac to your SD card.
Tip:
After the transfer, you can use the Mac Photos app to automatically delete the photos on your iPhone to free up space on the iPhone.
Pros
• You don't need to install any other apps.
• It's free to use.
Cons
• You can only transfer photos in Camera Roll.
• You cannot transfer photos back to your iPhone using the Photos app.
Method 4. How to Transfer Photos from iPhone to SD Card via iCloud?
iCloud is a sync service for Apple devices, which means it can sync your files on multiple devices. To transfer photos from iPhone to SD card, you just need to let your iPhone pictures sync to iCloud and then download them to your SD card. Now check the step-by-step tutorial:
Step 1. On your iPhone: Go to Settings apps > tap on Name/Apple ID > iCloud. Hit the Photos tab and toggle on iCloud Photo Library to sync photos to iCloud.
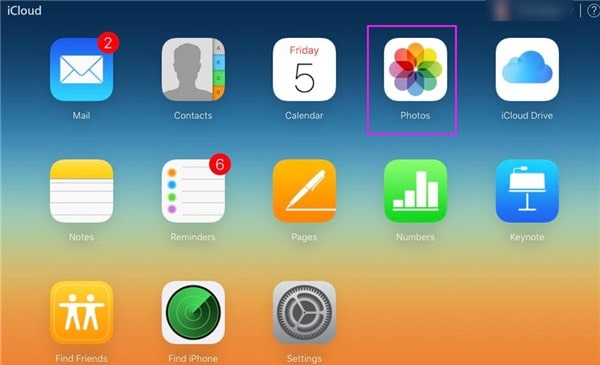
Step 2. Insert your SD card into a card reader and plug it into your computer. Open iCloud.com and log into iCloud with the same Apple ID on your iPhone.
Step 3. Choose Photos and select the photos you want to transfer. Set your SD card as the export destination and start downloading.
Pros
• It's workable on both PC and Mac.
• You don't need a USB cable to grab your content.
Cons
• iCloud only offers 5 GB storage for free.
• It's difficult to curate photos, iCloud list limited photo or media types for you to preview.
• If you turn on the iCloud photos library, you can no longer sync photos from PC to iPhone with iTunes.
• You can't encrypt your photos.
Method 5. How to Transfer iPhone Photo to SD Card via Documents by Readdle?
Documents by Readdle is an impressive iPhone file manager, which can open any files with ease, play videos and music, download files from the web to iPhone, and transfer photos, music, or videos from iPhone to computer simply with Wi-Fi transfer utility. To move photos from iPhone to SD card, all you need is a connected Wi-Fi network and this Documents app.
Step 1. Connect your iPhone and computer to the same Wi-Fi network.
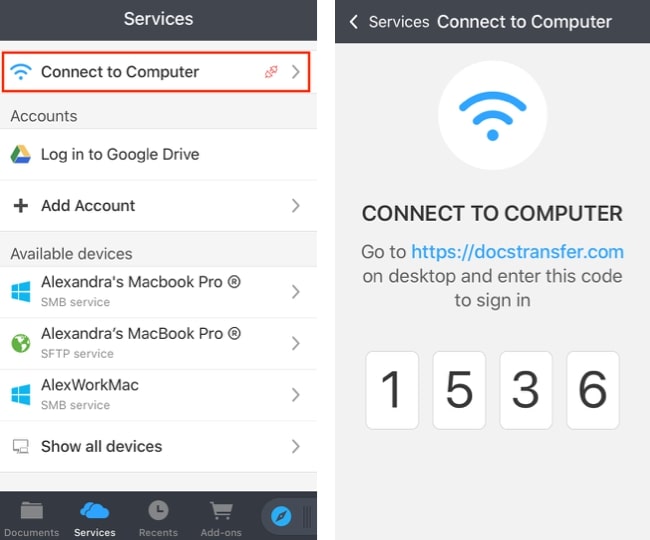
Step 2. Open the Documents app on your iPhone and tap on Connect to Computer. Then your iPhone will generate a code.
Step 3. On your computer, visit https://docstransfer.com/ on a browser and enter the code on your iPhone. Then your iPhone and computer are connected wirelessly.
Step 4. Then insert your SD card into a card reader and connect to the computer. Copy the photos from the computer to your SD card.
Pros
• It's free to use.
• It won't need any USB cable.
Cons
• The transfer speed can be slow when the network is unstable.
• It's hard to manage tons of photos.
• There is a file leaking risk during the transferring process.
Comparing 5 Methods
Comparison |
DearMob iPhone Manager |
Windows Explorer |
Photos App on Mac |
iCloud |
Documents by Readdle |
Transfer All Photos (Camera Roll, PC Synced) |
|
|
|
||
Encrypt Photos |
|
||||
Convert HIEC to JPG |
|
||||
Windows & Mac |
|
|
|
||
Transfer by category |
|
|
|
Final Words
If you're using a Windows computer and have a few photos to transfer, then Windows Explorer can help you out. The Photos app on Mac is a perfect option to import and delete photos on iPhone. If you want to transfer photos from iPhone to SD card in a well-organized way with high speed, DearMob iPhone Manager is ready for you. Click the button below to grab a free trial version with full features.


