How to unlock iPhone to import photos? Many iPhone users are bothered by these problems: when trying to import photos via Finder, Image Capture, or Mac Photos app, the application says please unlock your iPhone. But iPhone is already unlocked, 100 percentage sure.
If you have already tried to replug iPhone, update the device or update the mac system, reset system settings, and many other regular troubleshooting methods, but the problem still exists. Here are another five methods that are proved to be working.
Method 1. Tick Backup to This Mac instead of iCloud (Finder Settings)
Here is a success story from some users. They find that the backup setting in Finder is set to "Back up your most important data on your iPhone to iCloud". This could leads to Mac's false message that keeps asking you to unlock your iPhone, even if the device is already unlocked. Instead, you should changes the backup method to backup on the computer. Here is the simple tutorial:
Step 1. Unlock your iPhone and USB-connect it to a Mac.
Step 2. Open Finder, pair your iPhone to Finder, and click your device.
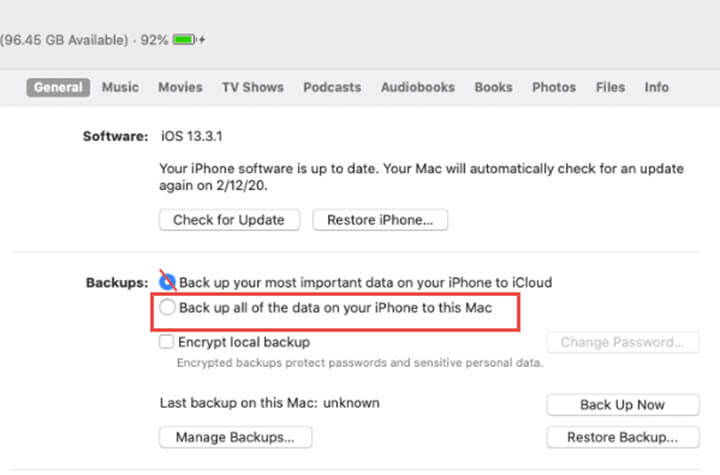
Step 3. Under General, Tick "Backup up all of the data on your iPhone to this Mac".
Method 2. Take a New Picture to Let Finder Know There is Something New
Some users find out a workaround to deal with this false unlock iPhone message issue:
Simply unlock your iPhone, and take a new picture.
And the reason behind this is, Mac Finders might mistakenly think there were no photos to import or sync.
To illustrate, as you have synced iPhone with Mac previously, so that all those photos were synced to the Mac, and when you plug in iPhone this time, either Finder or the Mac Photos app detect that there is nothing new to sync in terms of photos.
Consequently, it uses a rather misleading message to ask you to unlock iPhone. On Pre-Catalina macOS, the situation might use another message, such as "No Photos" on the App screen.
So, after you taking a new photo, either Finder or the Photos app realizes that you do have photos in the camera roll to sync. The Unlock message would be gone then.
Method 3. Use Photo Manager Tool to Transfer Photos
Finder and iTunes could be buggy when you are trying to sync photos. Using a photo manager tool can help you in two ways:
- Find out where things go wrong: is it your iPhone or is it Finder?
- Act as the best iTunes alternative: you can directly transfer photos without Finder or iTunes.
DearMob iPhone Manager will be used as an example. Let's see how it can solve this 'please unlock your iPhone' issue.
Step 1. Download and install DearMob iPhone Manager on your Mac (also has a Windows version).

Step 2. Use Face ID, Touch ID or pass code to unlock your iPhone. Tap trust this computer when prompted.
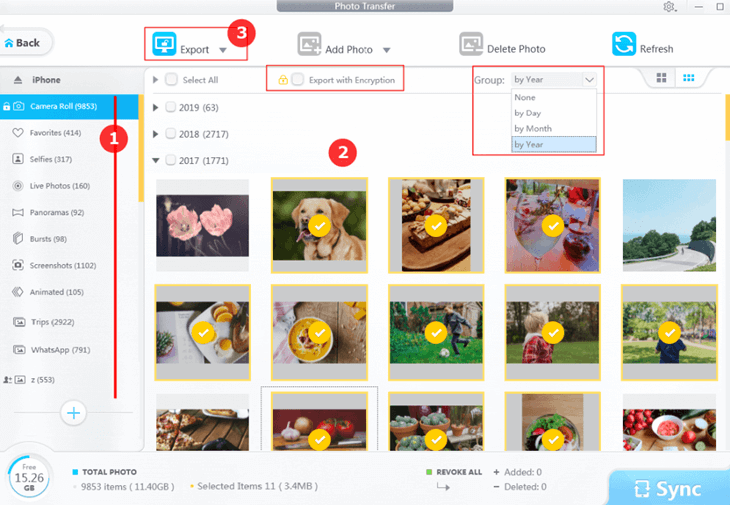
Step 3. Go to the photos icon from DearMob iPhone Manager main screen. You shall be able to see all the photos displayed.
Method 4. Turn off iCloud Photo Library on Your iPhone
Even though you thought you never enabled iCloud photo library, there could be chances that the option is already toggled on: the iOS upgrade might automatically turn on iCloud syncing, without you noticing it.
Check it here: iPhone settings > Tap your name on the top > iCloud, and tap into the photos section.

A little more explanation: iTunes syncing and iCloud syncing are by large mutual-exclusive. That means when you enable iCloud photo syncing, you cannot use iTunes photo syncing.
Method 5. Delete the Corrupted Lockdown Folder Files
Another possible culprit is related to the lockdown folder.
Previously, when your iPhone works properly on Mac, you knew how the whole process goes: you unlock your iPhone, and Mac says you should trust this computer on iPhone. You tap that Trust option, and then you shall be able to access iPhone content from Mac.
Each time you tap trust this Mac, the authorization will create files in the lockdown folder. When it is corrupted somehow, you might see Finder asks you to unlock your iPhone, even though it's already locked.
So what you can do now is to delete that corrupted lockdown folder. And you won't need to worry about the deletion, because next time when you plug in your iPhone and trust the computer, it will recreate new files for the lockdown folder.
Make sure to unplug your iPhone, and follow these steps:
Step 1. Go to /private/var/db/lockdown/ on Mac.
Note: you cannot directly find it in Finder. Press shift+ Command + G to call out the go-to option, then copy and paste the path.

Step 2. Delete the lockdown folder.
Step 3. Unlock your iPhone and plug it to Mac.
Method 6. Update or Reinstall the Apple Mobile Device Driver
This method is a regular step to troubleshoot iTunes not recognizing iPhone error, and it also helps if you are using Finder on macOS Catalina. Below are detailed steps:
For Windows users:
Step 1. Unlock your iPhone screen, unplug and replug it to the computer. Make sure iTunes is not running.
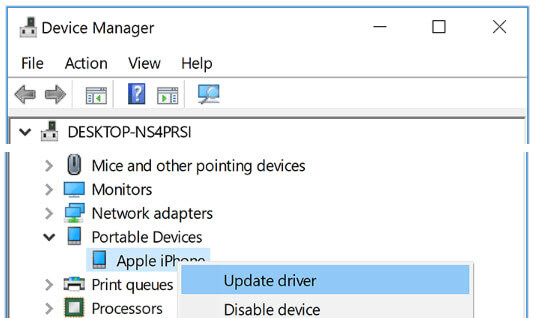
Step 2. Open the Device Manager window (right-click the Windows button, or searcd Device Manager in Start menu).
Step 3. Right click your device and hit update driver.
If you still cannot solve the problem, go further reading this article with more solutions to iPhone connection error.
For Mac users:
Step 1. Unlock your iPhone/iPad screen, and USB-connect it to the computer.
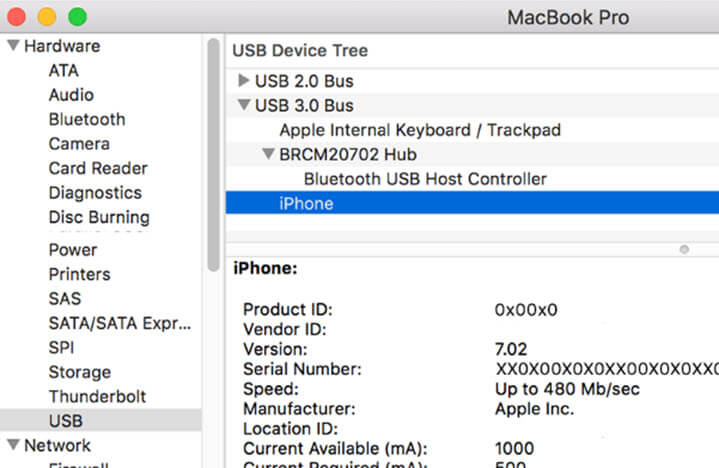
Step 2. Press down the Option Key and hit the Apple menu. You shall see System Information (or System Report on some macOS version).
Step 3. In the newly opened window, scroll down and go to USB.
Step 4. If you see iPhone is listed in this section, go install the lasted updates of macOS.
Update or download the Apple Mobile Device driver shall solve the connection error. However, if Finder still says you need to unlock your iPhone to import photos and other content, try methods 1 to 4 above.


