How to Delete Custom Ringtones from iPhone/iTunes/Garageband
By Joakim Kling - Last Updated: Contact Author
iPhone has ringtones pre-installed, but many users still want individualized ones downloaded or made by themselves. However, adding new ringtones to iPhone is not that simple since there"re many limitations.
To be specific, iPhone only supports ringtones in M4R format within 40 seconds. And making and transferring ringtones need to be done on computer through iTunes. Some third-party ringtone editing software works too, such as iBrickr, Audacity and DearMob iPhone Manager, to name just a few.
Nevertheless, the real problem does not lie in ringtones addition, but ringtones deletion. "How to delete custom ringtones from iPhone" has become an often-seen issue nagging many iPhone users. This tutorial is going to offer you various methods for ringtone deletion from iPhone, with solutions to solve your "unable deleting" problems.
Cases of Can't Delete Ringtones:
"I've been trying to delete custom ringtones off my iPhone XS running on iOS 12 without any luck. They are in mp3 format. I connected the iPhone to my Mac, opened iTunes and saw that there was a Tones folder on the left-hand side. I clicked on it and there was nothing. Right clicked it, nothing at all."
"I created a 20-second custom ringtones using Audacity, and then added to iTunes (version 12.7.5.9). iTunes was used to delete unwanted ringtones, which at first seemed successful. However, after properly disconnecting from iTunes, the supposedly deleted ringtones are still on the phone. How do I delete the unwanted ringtones on phone?"
Is it difficult to delete custom ringtones from iPhone? It depends. But to delete any ringtones created or added by iTunes or other mainstream ringtone makers, DearMob iPhone Manager is a good tool to try.
How to Delete Ringtones from iPhone with DearMob iPhone Manager
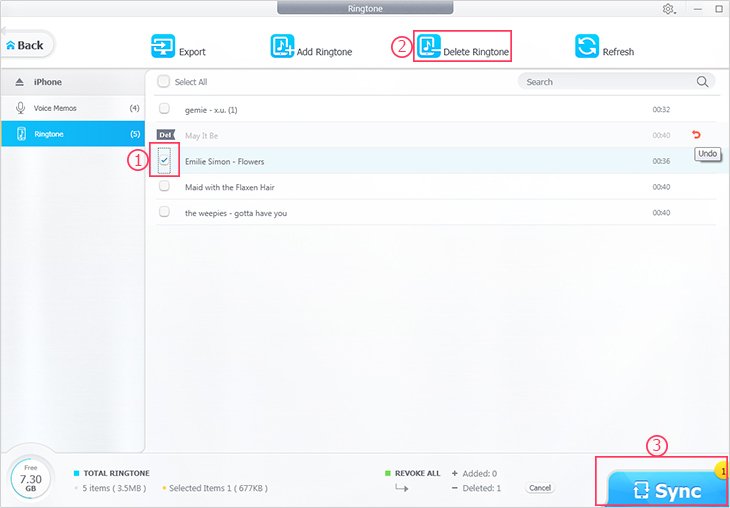
Step 1. Launch DearMob iPhone Manager and tick the "Ringtone" icon. Click the "Delete Ringtone" button.
Tips: You can click the red curved icon to undo deleting or click the "Cancel" button to revoke all deletions.
Step 2. Hit the "Sync" button to synchronize the changes to your iPhone.

How to delete ringtones from iPhone with iTunes
Step 1. Launch iTunes on your computer and then connect your iPhone to your computer using cables that came with it.
Step 2. Select the "Summary" tab above the main pane on the right and check the "Manually manage music and videos" option.
Step 3. Click the "little arrow" to the left of your iPhone"s icon which reveals several folders underneath showing different media and books currently stored on your phone.
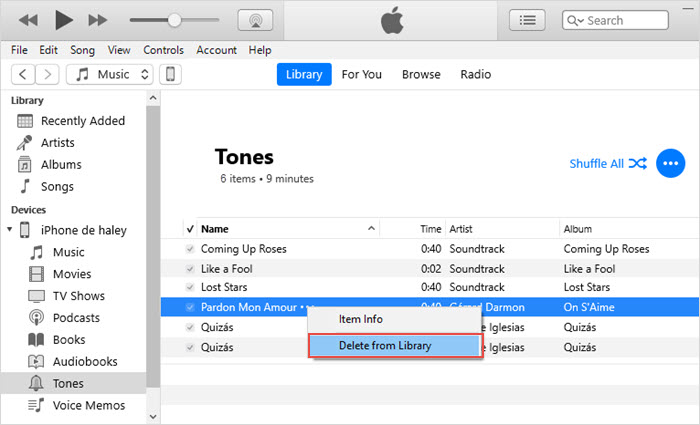
Step 4. Click the "Tones" folder to display a list of its resident custom ringtones, right click on the ringtone you want to delete from the list, and choose "Delete from Library". Or press "Backspace" button on your keyboard to delete your selected ringtones. Afterwards, select "Delete" when prompted.

Step 5. Select the "Ringtones" button under Library towards the top of iTunes" left pane if you want to permanently get rid of unwanted ringtones and prevent them from reappearing on your device after your next sync.
Step 6. Click on the ringtones you want to delete from the list on the right pane. Hit the "Delete" or "Backspace" key on your keyboard to delete the selected ringtones. Last but not least, select "Remove" and then "Move to Recycle Bin" or "Move to Trash" on the next two pop-up windows.
Tips: iTunes supports basic ringtones deletion, but it fails to optimize the function of ringtones management.
How to delete iPhone ringtones from Garageband
Step 1. Connect your iPhone to your computer and open iTunes on your computer. Your connected device will then appear as an icon in the upper-left corner of the iTunes window.
Step 2. Select the icon for your iPhone, click "File Sharing" in the sidebar under Settings, then "GarageBand" in the Apps list. Do one of the following to import the ringtones:
- Drag a ringtone to the GarageBand Documents list.
- Click "Add", navigate to the location of the ringtone you want to add, select it, and then click "Choose".
- After you import a ringtone, you can open it in the "My Songs browser".
Step 3. In the "My Songs browser", click "Select" and then choose a ringtone.
Step 4. Tap the "Share" button and then tap the ringtone until the export ringtone panel opens.

Step 5. Select your ringtones. Then, a new window will pop up to show all previously exported ringtones.
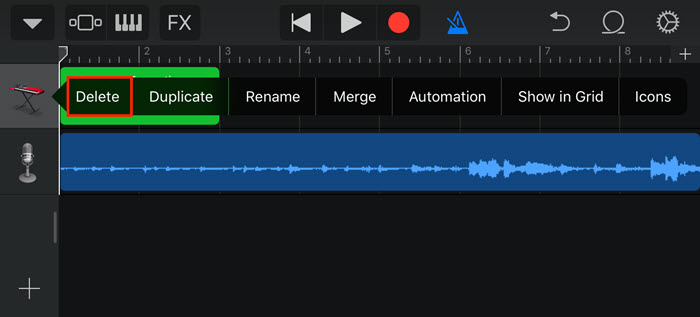
Step 6. Hit the "Edit" and the "Delete" button to delete the unwanted ringtones.
Step 7. Tap the "Done" button to finish the deletion.


