
By Joakim Kling -
Contact Author
Your iPhone Has Never Been Backed Up to This Computer? Fixed
 If you are searching for a quick fix, click here: The solution most recommended by us [85%]
 Spotlight - DearMob iPhone Manager vs. iTunes
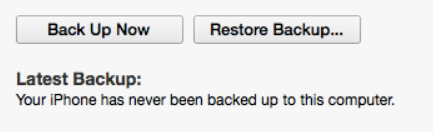
If iTunes says "Your iPhone has never been backed up to this computer" even after you clicked Back Up Now, there are usually two situations. Sometimes iTunes appears to back up normally, runs for several minutes, shows no error, and still leaves the same message under Latest Backup. In other cases, the Back Up Now button greys out for only a second or two before becoming active again, with no backup showing up afterward. Those two situations look similar in iTunes, but they point to different problems. The first thing to find out is whether iTunes actually created a backup file.
First, Find Out Whether the Backup Actually Completed
Before changing cables, reinstalling iTunes, or resetting anything, check whether a new backup was actually created. If iTunes finishes a backup normally, Apple says the date and time of the latest backup should appear in the iTunes window. You can also check the backups stored on your computer.
If the backup exists
If you can find a recent backup on your computer but iTunes still says “Your iPhone has never been backed up to this computer,” the backup process may have completed while iTunes failed to recognize or list it correctly.
On Windows, Apple says local backups can be found under %USERPROFILE% when you use Apple Devices or the Microsoft Store version of iTunes, while older desktop versions of iTunes use %AppData%. On a Mac, backups are stored under ~/Library/Application Support/MobileSync/Backup/. In this case, focus on fixes that help iTunes recognize the backup rather than troubleshooting the cable or USB connection from scratch.
If no new backup exists
If there is no recent backup in iTunes and no new backup folder or files on the computer, the backup probably did not complete. Now it makes sense to troubleshoot the backup process itself: check available storage, reconnect the iPhone, confirm Trust This Computer, restart iTunes and the device, and make sure the Apple software on the PC is up to date. The important part is knowing which problem you have first. A backup that exists but is not recognized needs a different fix from a backup that never finished.
Solution 1: Backup Your iPhone Effortlessly in a Click without iTunes
If you cannot tell whether the backup problem comes from iTunes or from the connection between your iPhone and computer, try making a local backup without iTunes. DearMob iPhone Manager can back up an iPhone independently of iTunes and show the completed backup afterward. If DearMob completes the backup normally while iTunes still says "Your iPhone has never been backed up to this computer," that points more strongly to an iTunes-side problem rather than a basic connection or backup failure.
- Create a full local iPhone backup without using iTunes
- View completed backups with the device name, backup time, and iOS version
- Transfer photos, videos, contacts, and other data selectively
- Restore existing DearMob and supported iTunes backups when needed


You can use it as a quick check:
Step 1: Open DearMob iPhone Manager and choose Backup.
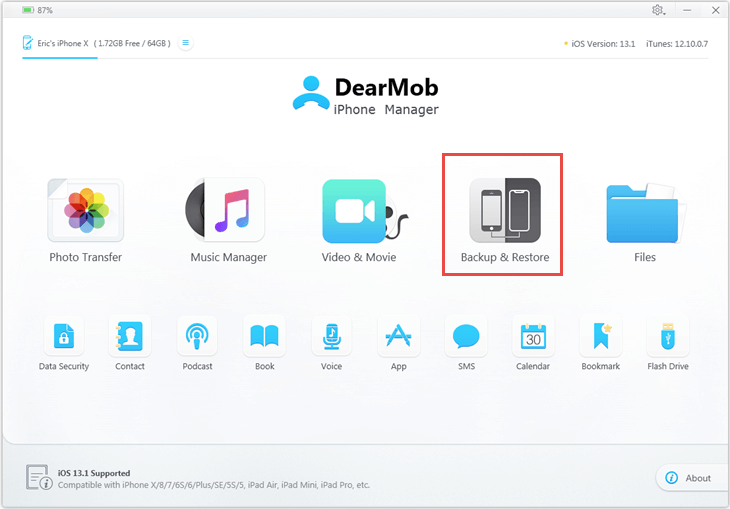
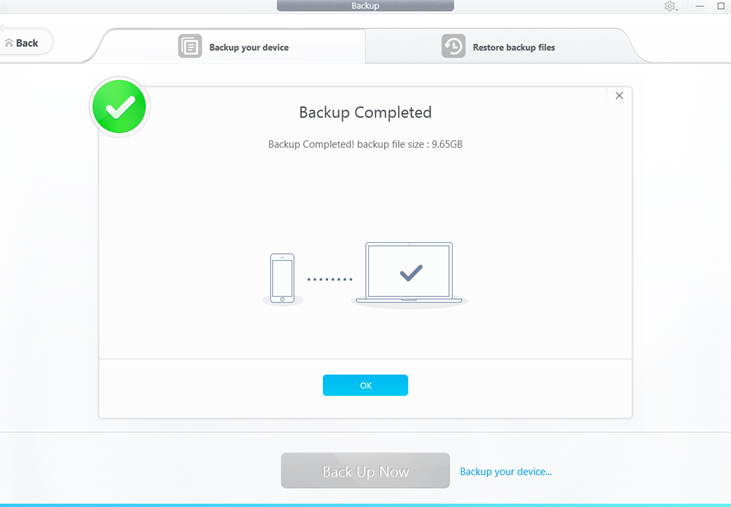
Step 2: Click Back Up Now. If the backup completes normally, you should see a confirmation when the process finishes.
Step 3: Open the Restore tab and check whether the new backup appears in the list. DearMob can also display supported backups previously created by iTunes, together with details such as the device name, backup time, and iOS version.
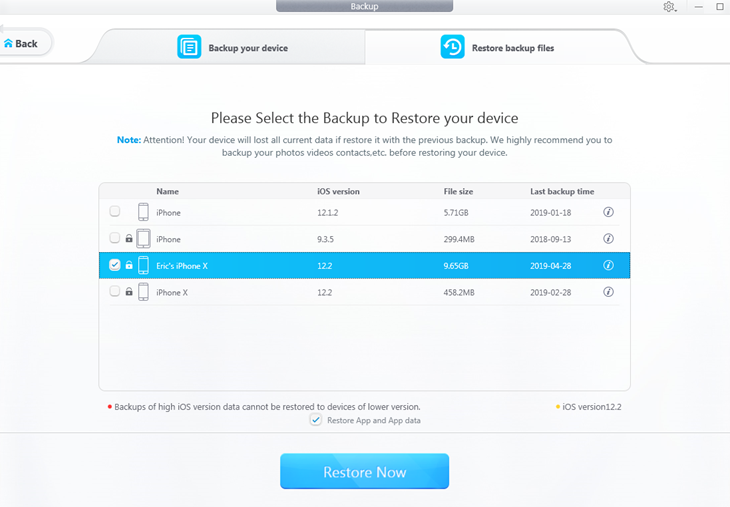
If DearMob can create and display a fresh backup but iTunes still reports that your iPhone has never been backed up, move on to the fixes below that focus on iTunes and its backup records.
Solution 2: Let iTunes Create a Fresh Backup Folder
If backup files are already on your computer but iTunes still says "Your iPhone has never been backed up to this computer," the existing backup folder may be incomplete or no longer working properly with iTunes. A simple way to test this is to keep the old backup safely aside and let iTunes build a new Backup folder from scratch.
Step 1: Close iTunes and find the MobileSync folder. On Windows, press Windows + R. Apple currently recommends using:
- %USERPROFILE% for iTunes installed from the Microsoft Store
- %AppData% for the older desktop version of iTunes
Then locate the MobileSync folder containing your iPhone backups. On older Macs that still use iTunes, the backup location is: ~/Library/Application Support/MobileSync/Backup/
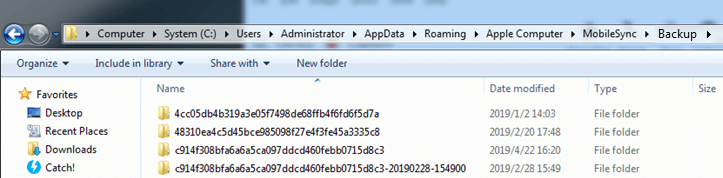
Step 2: If the backup contains anything important, copy the entire Backup folder to another safe location before making changes. Then rename the original folder from Backup to something easy to recognize, such as Backup-old.
Do not delete it, and do not rename or rearrange the individual files and device folders inside it.

Step 3: Reconnect your iPhone, open its Summary page in iTunes, and click Back Up Now. Because the normal Backup folder is no longer there, iTunes should create a new one and start a fresh local backup.
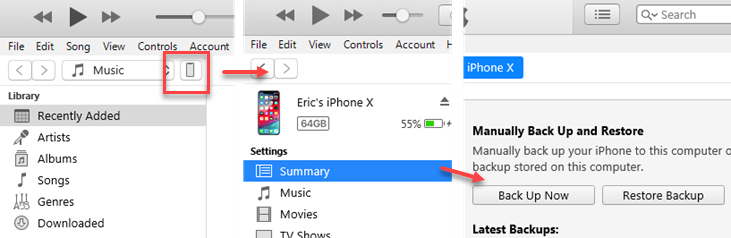
Step 4: Wait for the backup to finish. If the new backup works normally, iTunes should show its date and time under Latest Backup instead of saying your iPhone has never been backed up to this computer. You should also see a newly created Backup folder inside MobileSync. If that happens, the old backup folder was likely interfering with new backups or with the way iTunes was recording them.
Note:
- Keep Backup-old untouched until you are sure you no longer need the data inside it.
- This workaround is meant to test a clean backup; it does not automatically repair or re-register the older backup with iTunes.
Solution 3: Check the USB Connection and Trust Settings
If no new backup was created at all, make sure iTunes has a stable data connection to your iPhone. A cable can charge your iPhone and still fail to transfer data properly.
Step 1: Disconnect your iPhone, unlock it, and reconnect it directly to the computer. Avoid a USB hub for now.
Step 2: If your iPhone shows the Trust This Computer? message, tap Trust and enter your passcode.
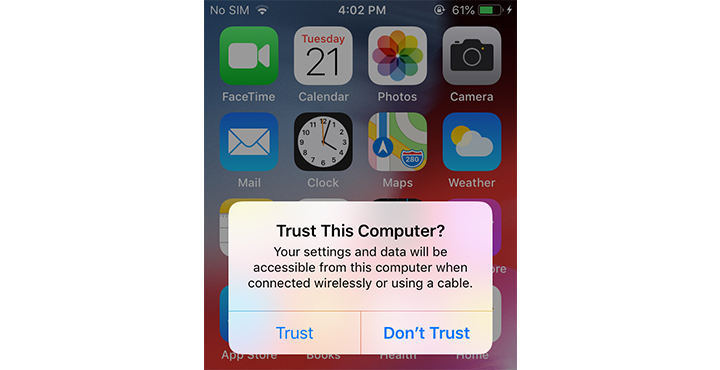
Step 3: Check whether your iPhone appears normally in iTunes. If it does not, try another USB port or a different cable that supports both charging and data transfer.
Step 4: Open the iPhone Summary page and click Back Up Now again.
If you previously tapped Don't Trust or the Trust prompt no longer appears, you can reset the Location & Privacy settings on your iPhone and reconnect it to trigger the prompt again.
Solution 4: Make Sure Your Computer Has Enough Free Space
A local iPhone backup is stored on your computer, not on the iPhone itself. If the drive holding the backup runs short of space, iTunes may fail before it can create a complete backup. Check the free space on the drive where your iPhone backups are stored. On many Windows PCs, this is the system drive even if iTunes itself was installed somewhere else.
If storage is running low, remove or move files you no longer need and try Back Up Now again. Apple specifically recommends freeing up disk space when a computer backup fails because there is not enough room. Also check for old iPhone or iPad backups you no longer need. Do not delete an old backup unless you are sure you will not need it for a future restore.
Solution 5: Update iTunes or Try Apple Devices
An older version of iTunes can also cause backup and device-recognition problems. Update iTunes, Windows, and your iPhone before trying another backup. On current Windows PCs, Apple now uses the Apple Devices app for iPhone management and local backups. If iTunes keeps saying your iPhone has never been backed up, you can also try creating the backup through Apple Devices.
Step 1: Install or update Apple Devices from the Microsoft Store.
Step 2: Connect and unlock your iPhone, then select it in Apple Devices.
Step 3: Open General and click Back Up Now.
If Apple Devices completes the backup normally while iTunes continues to show the old message, you can use Apple Devices for future local backups instead of continuing to troubleshoot the older iTunes workflow.
Solution 6: Check Antivirus or Security Software
If iTunes recognizes the iPhone and starts the backup but never finishes, security software on Windows may be interfering with communication between iTunes, Apple services, and the device. To fix, start by updating your antivirus, firewall, VPN, or other third-party security software. Then restart the computer and try the backup again.
If the problem continues, temporarily pause the third-party security software long enough to test another backup. Re-enable it as soon as the test is finished. If the backup suddenly works, check that security program's settings or contact its developer rather than leaving protection disabled. Apple also lists third-party security software as a possible cause when iTunes does not respond or a Windows backup never finishes.
Solution 7: Restart Apple Mobile Device Service
If iTunes still has trouble detecting or communicating with your iPhone on Windows, restart Apple Mobile Device Service (AMDS). This background service helps iTunes communicate with connected Apple devices.
Step 1: Close iTunes and disconnect your iPhone.
Step 2: Press Windows + R, type services.msc, and click OK.
Step 3: Find Apple Mobile Device Service in the list. Right-click it and choose Properties.
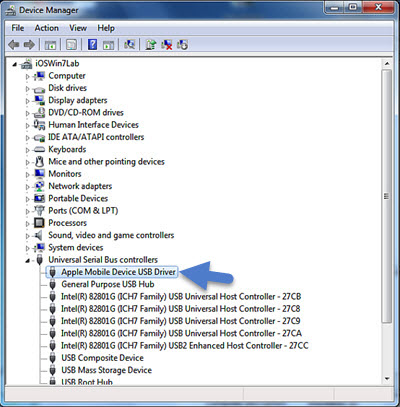
Step 4: Set Startup type to Automatic.
Step 5: Click Stop. After the service stops, click Start, and then click OK.
Step 6: Restart the computer, open iTunes, reconnect your iPhone, and try Back Up Now again.
Note: If Apple Mobile Device Service repeatedly stops or refuses to start, Apple says third-party security software may be interfering with the service. In that case, return to Solution 6 and check your security software before making deeper changes to Windows.
Final Words:
It is really annoying if iTunes says your iPhone has never been backed up to this computer while in fact you have clicked that "back up" button over and over again. Old backup file created by iTunes can be detected and restored by DearMob iPhone Manager automatically. This tool can also give your device an up-to-date fully backup without glitches, and that's only an iceberg of What DearMob iPhone Manager is capable of. In fact, you can selectively backup iPhone and transfer dozens of file types from iPhone to other devices, including photos, movies & TV shows, digital books, contacts card, safari bookmarks and many more.