Today, we upgraded to macOS 15 beta version just to test out how Finder works in replacement of iTunes backup & restore on macOS Catalina. And here is what we found below:
1. Finder on macOS Catalina is much more user friendly than iTunes regarding iPhone data backup.
2. iTunes backup mechanism is totally inherited by Finder on macOS Catalina, which means they are almost the same.
3. macOS Catalina Finder cuts down the backup time of iTunes by half and you can locate the backup file right away on the same panel.
Back up iPhone with DearMob iPhone Manager on macOS Catalina
DearMob iPhone Manager is a free tool focused on iPhone data backup and management for both macOS Catalina and Windows 10. It not only supports backing up whole iPhone device, but allows users to manually and selectively back up iOS photos, songs, movies, videos, podcasts, notes, calendar...
- 1-click back up all iPhone data to macOS Catalina.
- 20 minutes to backup 64GB iPhone data with intact quality.
- Back up selected items only without duplicates or erasing.
Part 1: How to back up iPhone with Finder on macOS Catalina vs iTunes backup?
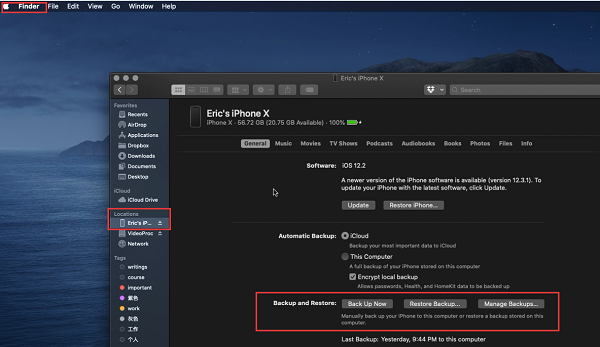
iTunes and Finder works almost the same for iPhone backup. After connecting your iPhone to macOS Catalina, Finder will auto pop up and detect your iOS device immediately.

Step 1: Connect your iOS device – iPhone with your macOS Catalina installed Mac and trust.
Step 2: Click your device name on the left side bar of Finder under Location
Step 3: Stroll down to find Backup and Restore section
As it is in iTunes, there are 2 options – "Back Up Now" and "Restore Backup…", plus an additional button – "Manage Backups…"
For video tutorial, pls go to How to Sync/Back up iPhone with Finder on macOS Catalina >>
Part 2: iTunes backup vs iPhone backup with Finder – Finder is more User-friendly
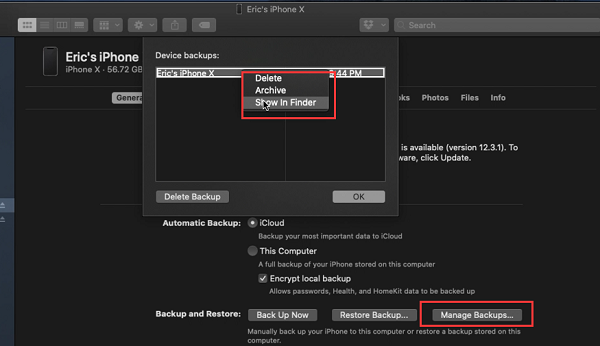
Compared to iTunes backup on macOS older version, iTunes offers no additional choice of "Manage Backups…", by providing which Finder has made it easier to locate where your iPhone backup files are stored:
Clicking "Manage Backups…" button, a pop-up window will show all your device backups straightforward. There, you can right click and easily choose Delete, Archive or Show in Finder. The backup location is just the same as it was before in iTunes, which is under Library > Application support > Mobilesync.
So, no worries, all your data are right in the places where you once stored them. Finder has just made it more convenient to access and manage.
Read more: How to change iPhone backup location >>

Part 3: iTunes backup vs iPhone backup with Finder - Backup Speed/file size comparison
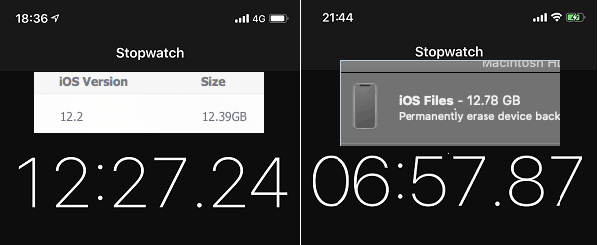
Before updating to macOS Catalina, we hands-on tested using iTunes to back up a 64GB iPhone X with 20.56GB storage available. It took 12:27 minutes to back up the device with an iOS backup file size of 12.39 GB.
After macOS Catalina update, it took only 6:57 minutes to back up the whole device in Finder with an iOS backup file of 12.78 GB on macOS Catalina.
Aparantly, the new macOS update with Finder backup has successfully shortened the time spend on backing up an iPhone.

Part 4: Back up iPhone without Finder on macOS - DearMob iPhone Manager
However, during the test, there are serveral times that we came across iTunes "Back Up Now" button greyed out issue on Mojave, and the causes are varied. And there's no selective data backup choice within Finder to let us choose what data does and does not get backed up. Therefore, we recommend DearMob iPhone Manager as an all-in-one solution for iPhone data management covering full/selective backup & restore as well as two-way transfer & syncing.

Step 1: Connect your iPhone to your computer with USB cable.
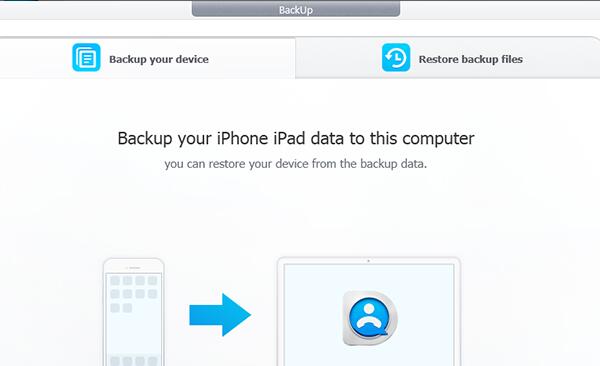
Step 2: Launch DearMob iPhone Manager and click "Backup".
Step 3: Simply click on "Backup Now" and you will get a full iPhone backup file.
DearMob iPhone Manager delivers the best experience for backing up iPhone/iPad devices without iTunes or Finder. It introduces a whole different syncing/transferring mechanism from iTunes/Finder. It targets at moving every individual files instead of syncing whole data of a library between your devices.


