Photos take up too much space on your iPhone? Always fail to send a large number of photos to others via instant messaging apps? Google Drive comes to your rescue with free cloud storage services. It empowers you to back up photos up to 15GB from your iPhone and easily share via a link.
In this post, we'll show you how to upload photos to Google Drive from iPhone in 3 methods. Before we start, make sure you set up a Google account and get the Google Drive app on your iPhone.
How to Upload Photos to Google Drive from iPhone Automatically
Previously, Google Drive allowed uploading photos from iPhone automatically as long as you enabled Backup & Sync in its Settings. However, backup and sync is no longer available on Google Drive. To automatically transfer photos from iPhone to Google cloud storage, you need Google Photos, a standalone app specializing in managing photos from iPhone with a Google account.
Step 1. Open Google Photos on your iPhone and sign in with a Google account.
Step 2. Allow it to access your photos when it asks for your permission. Alternatively, you can go to iPhone "Settings" > "Google Photos" > "Photos", and allow it to access all photos or selected photos.
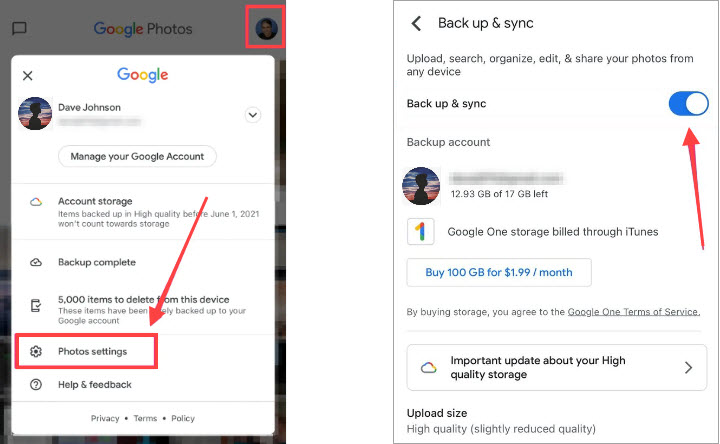
Step 3. Tap the profile image on the top right corner of Google Photos. Go to "Google Photos settings" and enable "Backup & Sync".
Step 4. Choose to upload in high quality or original quality. Then it will start to back up photos and videos on your iPhone.
Things to note:
- Google Photos only runs on iOS 15.0 or later.
- The maximum storage is 15GB (shared across Google Photos, Google Drive, and Gmail).
- Your photos will be removed if you are over your quota for 2+ years.
How to Upload Photos to Google Drive from iPhone Manually
Despite Google Drive discontinuing the auto-sync option, it keeps the basic uploading features for all users. Manually uploading photos from iPhone to Google Drive will take much more time. So if you just have a handful of photos to back up or share, this method is worth a shot.
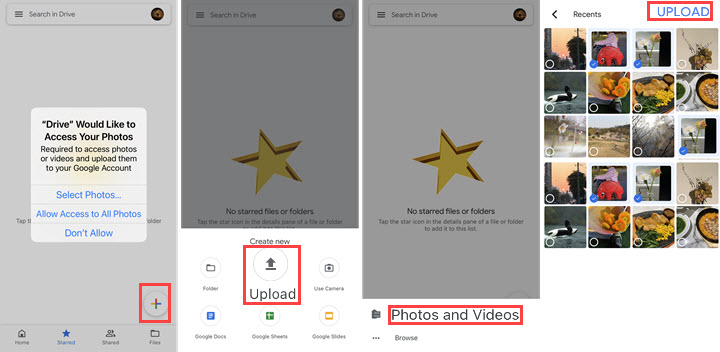
Step 1. Open the Google Drive app on your iPhone. Tap the plus icon in the main interface.
Step 2. Tap "Upload" > "Photos and Videos". Allow it to access selected or all photos on your iPhone.
Step 3. Select the photos you want to upload. Tap "Upload" on the top right corner and wait for it to process.
Step 4. When it finishes, you can photos in the "Files" tab.
Step 5. Tap the three-dot icon beside the filename, and you can share, move, delete, rename, and duplicate the photo.
Things to note:
Instructions above only upload pictures in the Photos app on your iPhone. If you have photos in Safari downloads or the Files app, view the photo, tap the share icon, and upload it to Google Drive.
How to Upload Photos from iPhone to Google Drive on Computer
Want to use a computer to upload photos to Google Drive? The first thing is to transfer photos from iPhone to the computer. Things are no-brainer on Mac with the assistance of AirDrop, Finder, or the Photos app.
But when you may find that you can't import all photos from iPhone to Windows PC for various reasons. To solve the problem effectively, try DearMob iPhone Manager, a powerful iOS file management tool that can import photos from iPhone to Mac and Windows without any error. Meanwhile, it provides complete solutions to back up, restore, sync, and manage iPhone photos, videos, music, apps, documents, and 17+ types of files.
DearMob iPhone Manager - Quick Transfer from iPhone to Computer
- Transfer 10k+ photos between iPhone and computers within 2 minutes.
- Support HEIC, PNG, HDR, Apple ProRAW, live photos, burst photos, and more.
- Keep the original quality, album structure, and geo tagging information…
- Smooth wired and wireless connection, allowing multiple iDevices.
- Fully or selectively back up iPhone photos by albums/year/month/date.
Step 1. Download and install DearMob iPhone Manager on your computer.
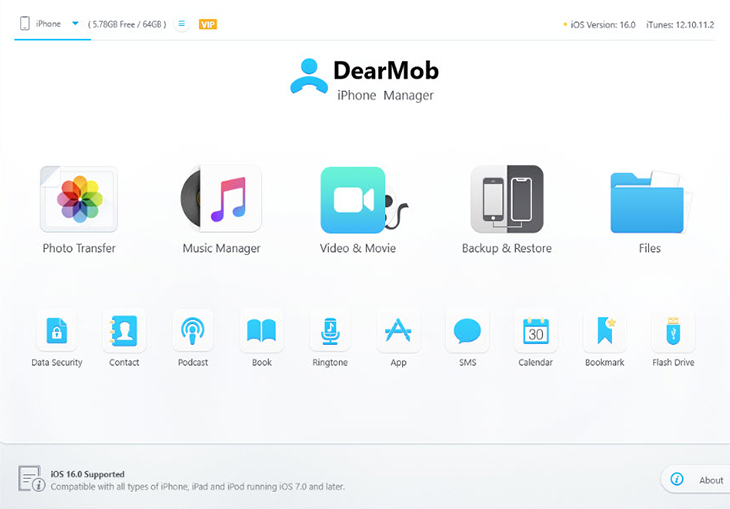
Step 2. Connect your iPhone to the PC via USB. Open DearMob iPhone Manager and click "Photos" on the main interface.
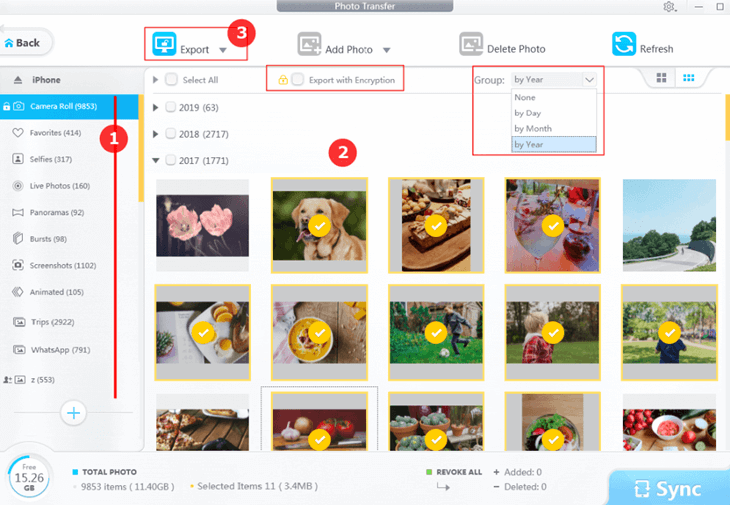
Step 3. Click to select photos. Click "Export" to transfer photos from your iPhone to your computer. (If you want to save iPhone photos as JPG in Google Drive, click the drop-down menu in "Export" and ask it to convert HEIC to JPG.)
Step 4. Visit drive.google.com on the web browser. Log in with your Google account.
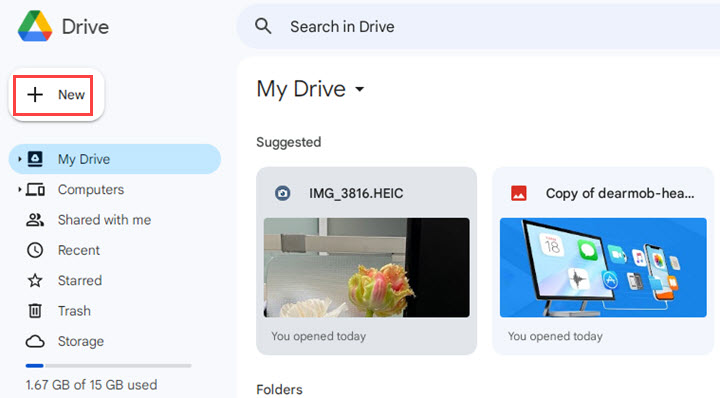
Step 5. Click "+New" to import photos or a photo folder just exported from your iPhone. Then it will take a while to finish uploading.
FAQs
How do I upload all my photos from iPhone to Google Drive?
Firstly, make sure it has enough storage to hold all your photos from iPhone. Then allows it to access all photos on your iPhone. Note that Google Drive does not offer a "Select all" option, so you have to tap them one by one in the upload interface.
How to upload photos to Google Drive from iPhone without an app?
If you do not install its app version, you cannot upload photos to Google Drive from iPhone directly. You can transfer photos from iPhone to your computer. Open the browser on your computer, go to drive.google.com, and upload these photos.
How to upload iPhone photos to Google Drive as JPG?
Google Drive saves photos in their original formats. If your photos were taken in the iPhone camera and saved in HEIC, you need to convert HEIC to JPG before uploading to Google Drive.
How to download photos from Google Drive on iPhone?
Log in to the Google Drive that contains the photos you want to save. Tap a photo and hold for a while, then tap to select more photos. Tap the three-dot icon and select "Make available offline". But note that you can't save photos from Google Drive to the iPhone camera roll directly. This option only allows managing photos within Google Drive without network connections.
How to share photos on Google Drive from iPhone?
To share a specific photo, just tap the three-dot icon beside its filename and create a share link. Then anyone who get the link can view the file. If you have a pile of photos to share, you need to create a folder, upload photos to the folder, then send the share link of the folder to your contacts.

