iPhone Live Photo is a great feature that helps remember the behind story of an iPhone picture, but why we need to convert Live Photo to still image? Simply, it is because that Live photos take much more space than still images.
If you capture a still scene in Live mode, there is about 0.16MB difference between Live Photo and still image. When you take photos of a moving environment, there must be more details for a Live Photo to contain, roughly about 0.39MB extra details compared to a still photo in my experiment.
When a large number of Live photos exist, they will occupy much storage space of your iPhone causing no space for other files. So, converting Live photos to still pictures is imperative when your iPhone storage is running out.
How to Convert Live Photo to Still on Windows Computer
To make Live Photo still on Windows, you need third-party help. As mentioned above, DearMob iPhone Manager is the ideal choice for you to convert Live Photo to still picture.
Step 1. Download DearMob iPhone Manager on the Windows computer, double-click the .exe file to install and then launch it.
Step 2. USB-connect your iPhone handset to computer, and tap "Trust This Computer" to continue if there is a popping up message on your device. This step allows DearMob iPhone Manager to access your iPhone based on your agreement.
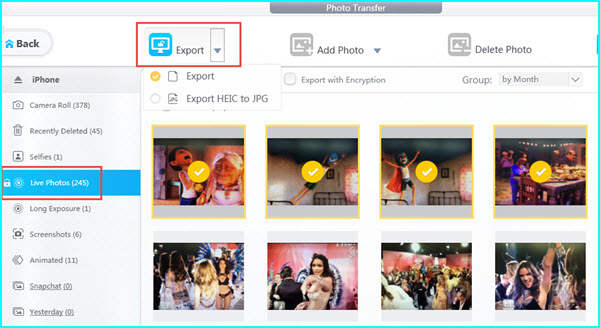
Step 3. After connection, click on Photo Transfer on the main UI of this software to see your iPhone Live Photos.
Step 4. Click on "Live Photos" in the left bar where all of your moving pictures are categorized here.
Step 5. Simply choose one or more than one Live Photos you want to convert to still images, and click on "Export" on the top bar. Then, DearMob iPhone Manager will automatically convert iPhone Live Photo to still as well as turn Live Photo into MOV video.
Notice. This method is much easier than using the Photos app to convert Live photos to still, as iPhone Photos app only allows you to convert one by one while this software enables you to turn all the Live photos into still at once. If you have edited your Live Photo and added filters to it, DearMob iPhone Manager can also recognize it and export the edited Live Photo and original Live photo to a still image and a video at the same time.
Also read: How to Convert iPhone Live Photo to Video >>
How to Convert Live Photo to Still on Mac
Converting iPhone Live Photo to still image on Mac is quite easy. Just USB-connect your iPhone to Mac > make your iPhone device trust your Mac computer > launch Photos app on Mac > choose Live photos on your iPhone that you want to remove the animation, and click "Import the selected" to import iPhone photos to Mac for further conversion. Then, follow the steps.
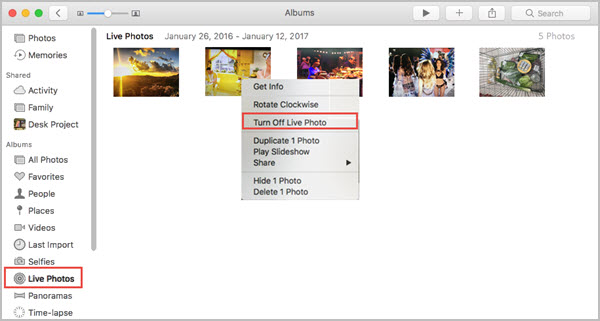
Step 1. After importing, you need to select the photo which you want to change into the still. If you do not know which photo is Live, you can simply hover the mouse on any photo to see if it comes alive.
Step 2. Now, you need to right click on the image and select Turn off Live Photo in the menu. Then, the Live Photo will be converted to still picture.
Notice. You need at least macOS Sierra to be able to see Live effects of Live Photo on Mac, and convert turn Live Photo into still. If your Mac is shipped with older macOS, you'd better upgrade it or turn to DearMob iPhone Manager Mac version to convert Live Photo to still on Mac.
How to Convert Live Photo to Still Image on iPhone
If there is no need for you to extract still from Live Photo to computer, you can use iPhone Photos app to change your Live Photos into still pictures. However, something you should keep in mind is that if you save and modify a converted Live Photo to a still image, it can't be recovered back. So, backup the Live photos first if you need them in the future. And these kinds of methods are time-consuming as you can only convert one each time.
Method 1. Switch Off Live Photo Mode When Taking Photos with Camera App
If you are planning to take a photo without animated effect on your iPhone 6S (Plus) or newer, you can switch off the animation mode of Live Photo in the first step by just tapping the little concentric circles icon button on the top. Then, you will only get a still image.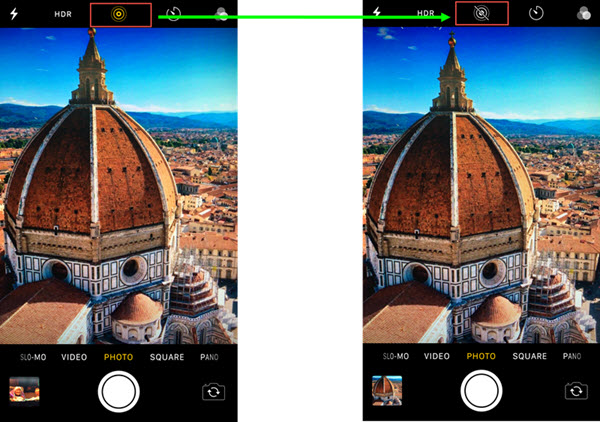
Method 2. Turn Live Photo Feature Off for Already Taken Images.
If you already have got a Live Photo on your iPhone and want to convert the Live Photo to still image, you can simply choose the Live Photo you want to convert > tap the Edit on the top right corner of your Live Photo > Tap the Live icon on the photo and then it will be switched off > tap Done in the bottom right corner to save the Live photo as still image.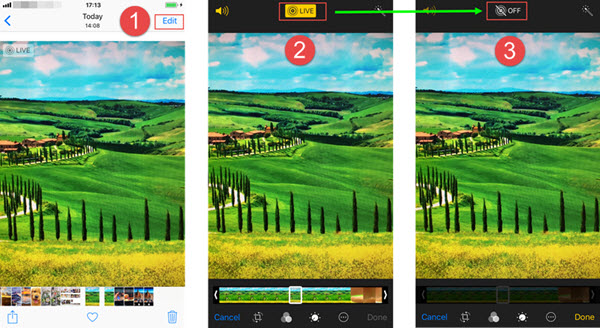
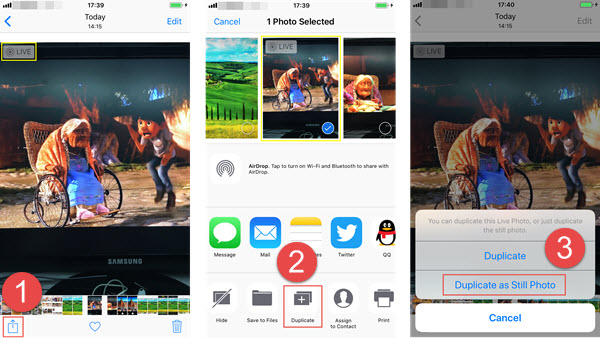
Method 3. Turn Live Photo into Still Image via iPhone Duplicate Function
Find the Live Photo you want to move animated effects > tap the arrow icon in the bottom left corner > switch to find "Duplicate" option and tap it > when there is a popup, tap "Duplicate as Still Photo" > then, the Live photo will be duplicated as a still image.Notice. After duplication, the original Live Photo is still here. You choose to convert Live Photo to still to free iPhone storage space, so you'd better delete the original Live Photo on iPhone.
At the end of this article, we once again recommend DearMob iPhone Manager to help you convert Live Photo to still on Windows as well as on Mac, for this software can turn Live photo into still as well as keep the original Live photo safe. Besides, if you want to share any animated image with your friend or upload to social media like Twitter, Instagram, Facebook, etc, DearMob iPhone Manager can help convert Live photo to video that is shareable with moving features.


